How to start a blog in WordPress? A detailed guide
-
Abdul Wadood
Expert bloggers make a lot of money, which inspires many people to start a blog. However, people hesitate to do so because they think it’s a complex task.
Trust me; the complication involved in starting a blog is nowhere close to what you’d imagine.
Even if you’re a person with little to no technical skills, you can easily create a blog and publish it on the internet in about an hour — thanks to WordPress.
I’m pretty sure that now you’re even more interested in learning about blogging. So, I have created a detailed guide on how to start a blog in WordPress.
Let’s begin!
What is a blog?
First, let’s get a quick overview of what a blog is.
A blog is an informational website that consists of content on particular topics (niches). These content are called blog posts.
Usually, the blogs are displayed in reverse chronological order (i.e., the latest blog posts appear at the top).
Besides acting as an informational resource center for readers, a blog can be a fantastic money-making opportunity for writers. If you want your blogs to generate revenue (by the way — who doesn’t), you should ensure to use the correct SEO strategies to make them rank higher on the search results.
Currently, there are about 570 million blogs published on the internet, which is mind-boggling. Also, there are around 31.7 million bloggers in the United States alone — as of 2020.
Great!
There are various blogging platforms such as Blogger, WordPress.org, WordPress.com, Wix, etc., through which you can create your blogging website. However, among them, WordPress.org is the best and the most popular blogging software.
Note: Though WordPress.org and WordPress.com have the same name, there are significant differences between them, which we’ll discuss below.
WordPress.com vs. WordPress.org
If you’re a beginner, I’m pretty sure that you’ll be confused between WordPress.com and WordPress.org. Much worse, some might even think both are the same — which isn’t true.
First, I’ll explain WordPress.com.
In WordPress.com, you can create a website and publish your blogs for free. However, if you’re starting a blog to generate income, there are several drawbacks with WordPress.com that you should note. Some of them include:
- WordPress.com places ads on all free websites. If you want to get rid of them, you should upgrade to their paid plans, which start from $48/year.
- If you opt for the free plan of WordPress.com, they will place your website under a subdomain. Here’s how it looks like — https://exampledomain.wordpress.com.
- If you want to remove the ‘Powered by WordPress.com’ link, you need to upgrade to their Business plan, which costs a whopping $300/year.
- The storage space is limited to 3 GB in the free plan of WordPress.com. Even if you upgrade to the Premium plan ($96/year), you only get a storage space of 13 GB, which is pretty low.
Speaking about WordPress.org, it’s open-source software, and you host the website yourself. Moreover, unlike WordPress.com, you have complete control over your website. You can add or remove plugins, install themes, and make any customizations to your website as you wish.
However, if you want to use WordPress.org, you should first purchase domain name and hosting, which costs about $70 for the first year. Once done, you can install WordPress and start building your website.
Long story short — if you want to start a blog as a hobby, you can try the free plan of WordPress.com. However, if you need to make money from your blog, there’s no doubt that WordPress.org is superior to WordPress.com — besides being more affordable.
Steps to start a blog in WordPress
The following are the steps to start a blog in WordPress:
Step #1: Choose a niche
Step #2: Choose a domain name
Step #3: Host your blogging website
Step #4: Install WordPress
Step #5: Customize the appearance of the blog (website)
Step #6: Install the necessary plugins
Step #7: Add a blog post
I have explained each of the steps in detail below.
Note: The steps explained below are applicable only for WordPress.org (self-hosted WordPress) and not WordPress.com.
Step #1: Choose a niche
The first step in starting a blog is to choose a niche. Some of the most popular blogging niches include:
- Marketing
- Travel
- Food
- Technology
- Lifestyle
Generally, as a blogger, you can write about anything you want. However, my suggestion is that if you’re a beginner, start writing blogs in a niche that you already know. For example, if you’re a tech freak, you can begin a blog related to technology.
If you follow this method, you can learn the basics of blogging pretty quickly. Once you gain some blogging experience, you’ll find it easy to blog on different topics.
Step #2: Choose a domain name
Once you find a niche, the next step is choosing a domain name for your website.
A domain name is the address of your website on the internet, which makes it one of the most significant parts of creating a WordPress blog. In simple terms, a domain name is an address that people type in the search bar to land on your website. For instance, the domain name of this website is rightyguide.com.
Below, I have listed some tips to come up with a good domain name for your website.
- Choose a brandable and easy-to-remember domain name.
- Give preference to shorter domain names over lengthy ones.
- Opt for the “.com” domain extension as it’s the most popular.
- Avoid using the same letters next to next.
- Avoid using hyphens and numbers.
It’s not possible to change/rename a domain name after you purchase it. However, you can buy a new domain name and assign it to your new website, which is a hectic task. Moreover, it’ll negatively impact the traffic and user experience.
Thus, follow the tips mentioned above and make sure to come up with a good domain name right from the beginning.
Ok!
Once you choose a domain name, the next step is purchasing it. You can buy a domain name through domain name registrars like Namecheap, or you can get it included in your web hosting service package (more on this in the next step).
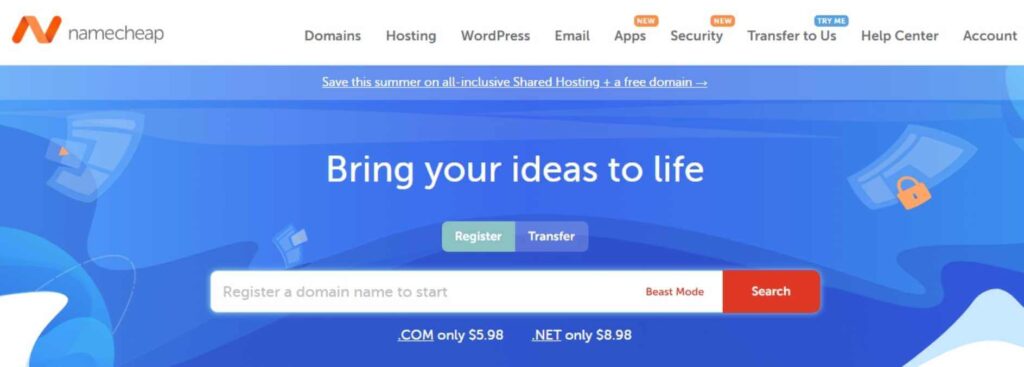
I personally recommend the second method to purchase a domain name. However, if you want to buy a domain name separately, you can buy it through domain name registrars.
Step #3: Host your blogging website
After choosing a domain name, the next step is to host your website on the internet.
There are several web hosting service providers out there. Among them, I find HostGator to be the best — especially for beginner websites. HostGator is affordable, user-friendly, and feature-loaded.
Moreover, HostGator offers a free domain name for a year along with their yearly plans. Generally, with HostGator, you can get your website published on the internet by spending less than $70.
Below, I have clearly explained how to sign up for HostGator’s web hosting service.
1. Choose your hosting plan
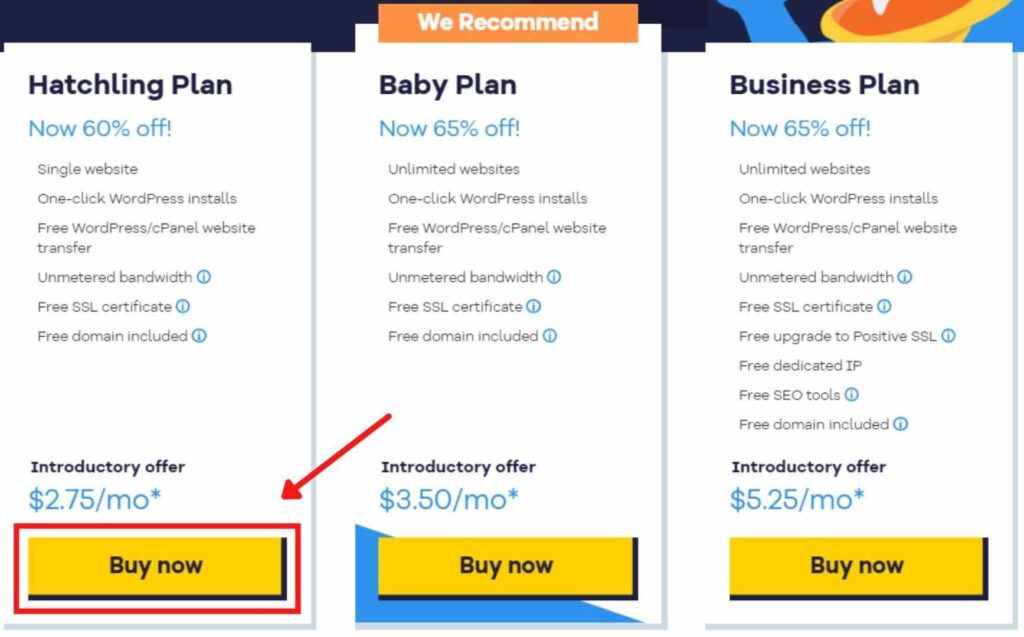
HostGator offers a wide range of hosting plans that you can choose depending on your requirements. If you’re a beginner, we strongly recommend the Hatchling Plan over other expensive hosting plans, as it has pretty much all the necessary features to make your blog successful.
Ok!
Click on the “Buy now” button to start the process.
2. Choose your domain name
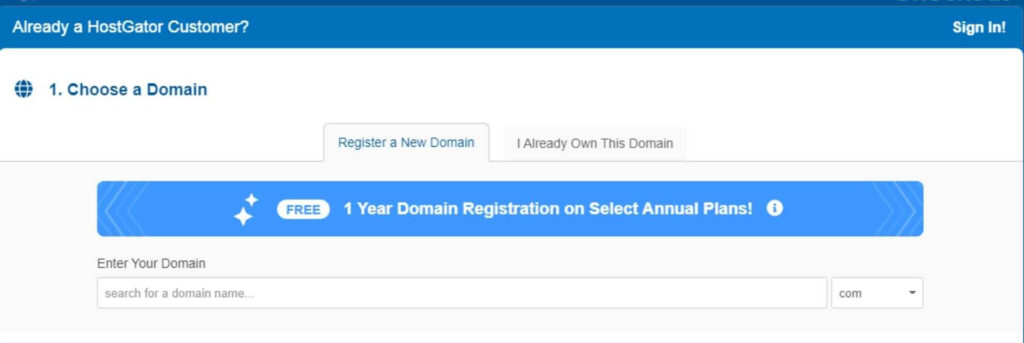
You can enter the domain name in the box and search for its availability. As mentioned before, you can’t change a domain name once registered. So, make sure to choose it wisely.
Also, note that if you opt for yearly plans, the domain name will be free for a year.
3. Enter the required account and billing information
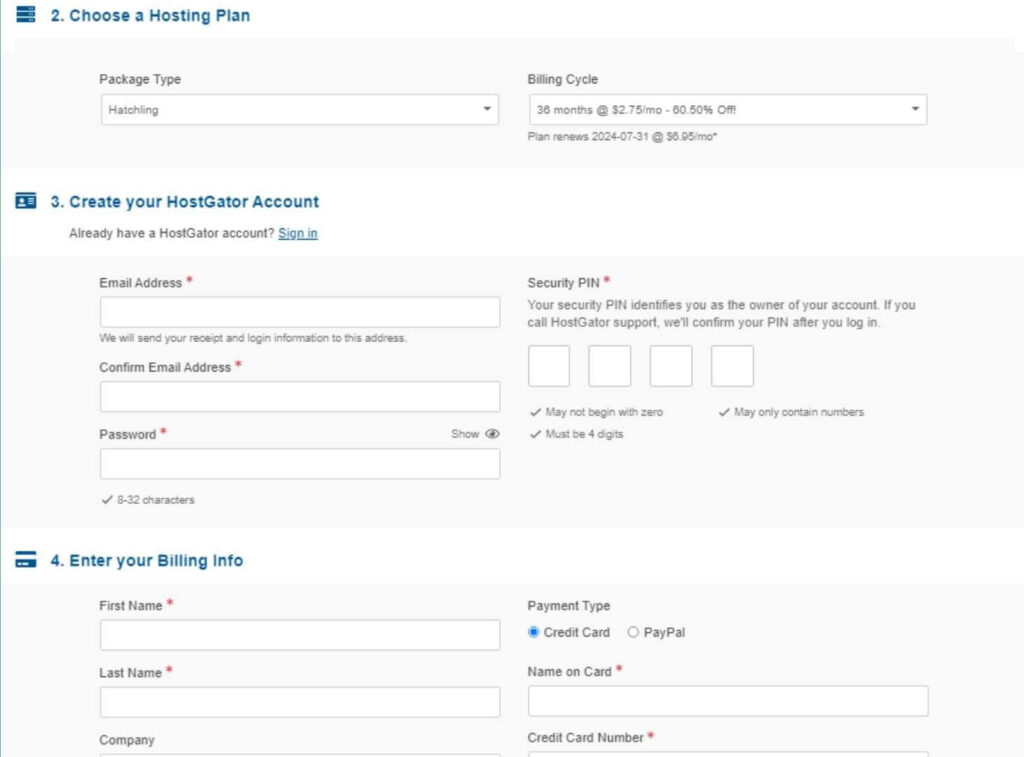
Once you choose the domain name, scroll down and enter the necessary account and billing information.
If you scroll down further, you can see a section where you can purchase add-ons. Though HostGator selects some add-ons by default, I personally don’t recommend buying any of them as they aren’t of much use.
4. Make the payment
Lastly, before proceeding with the payment, ensure that the coupon code box is populated. If not, you can use the code “RIGHTYGUIDE” and click on “Validate” to claim your offer.

Once done, click on the “Checkout Now” button to complete the purchase.
Step #4: Install WordPress
Great! You have successfully purchased the hosting for your website!
Now, it’s time to install WordPress on your website. Fortunately, HostGator has made it extremely simple to install WordPress.
- Log into your HostGator dashboard and click on the “Create website” button.
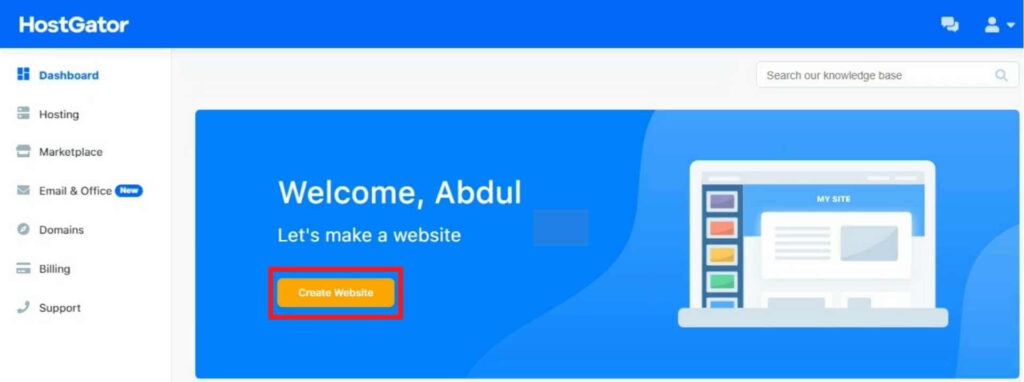
- This opens a new page. Click on “Get Started” to begin the installation process.

- Awesome! The installation is successful. Trust me; it takes just a few to install WordPress — thanks to the one-click WordPress install that HostGator offers.
- Copy the login credentials and click on “Go to WordPress“.
- Enter the login credentials to enter into the WordPress dashboard.
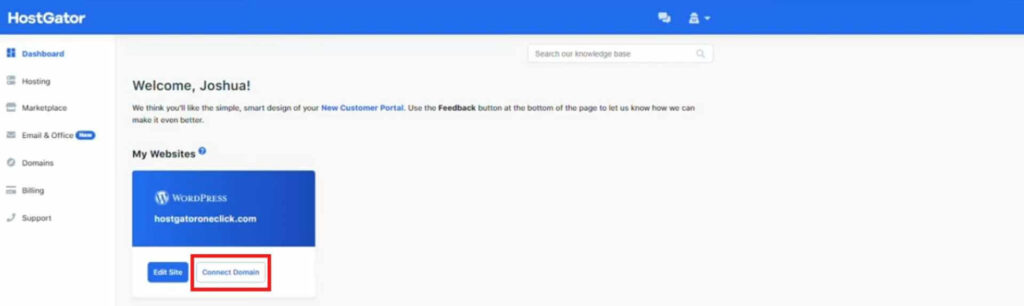
If you purchased the domain name through HostGator, you don’t have to connect the domain manually with your website as they will do it for you.
If otherwise, follow the steps below to connect the domain name with your website.
- Go to the HostGator dashboard. Under ‘My Websites’, click on “Connect Domain” to connect the domain name with your website.
- A pop-up will appear with two options — Show Me How and Contact Support. Click on “Show Me How” to proceed further.
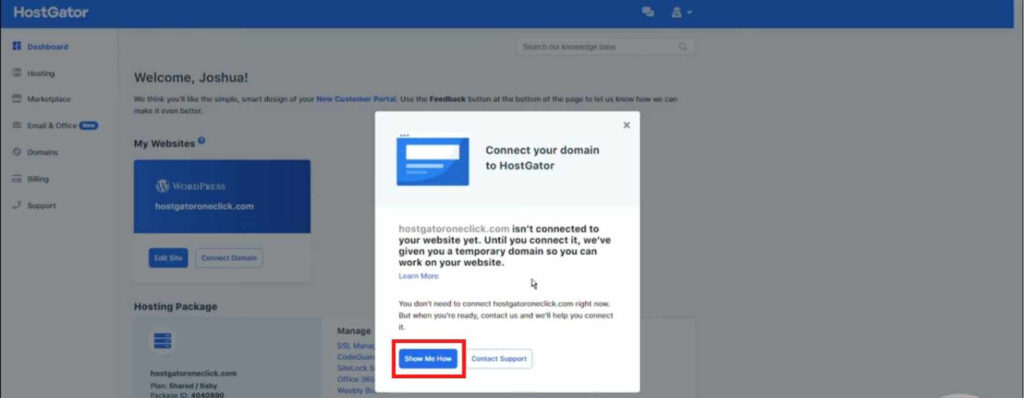
- A new page with the steps to connect the domain with the website will open. Copy the server names and change the DNS at your current domain name registrar.
Once done, click on “Verify Connection“. In about 24-48 hours, the domain name will be connected to your website.
That’s it! Now, let’s move on with customizing the appearance of the blog.
Step #5: Customize the appearance of the blog (website)
If you want people to read your blog, you should ensure that your website looks great. Fortunately, customizing the appearance of a WordPress website is pretty simple, thanks to the availability of a wide range of themes.
You should make sure to choose a theme wisely because it plays a significant role in determining the appearance of a blog. Thankfully, many themes available in WordPress are free to download; however, some are premium.
I personally don’t recommend spending money on premium themes as there are many fantastic free themes out there. Some of the free WordPress themes that I recommend are Kadence, Astra, and OceanWP.
Once you’ve chosen a theme, the next step is installing it. Here’s how you should install a theme for your WordPress blog.
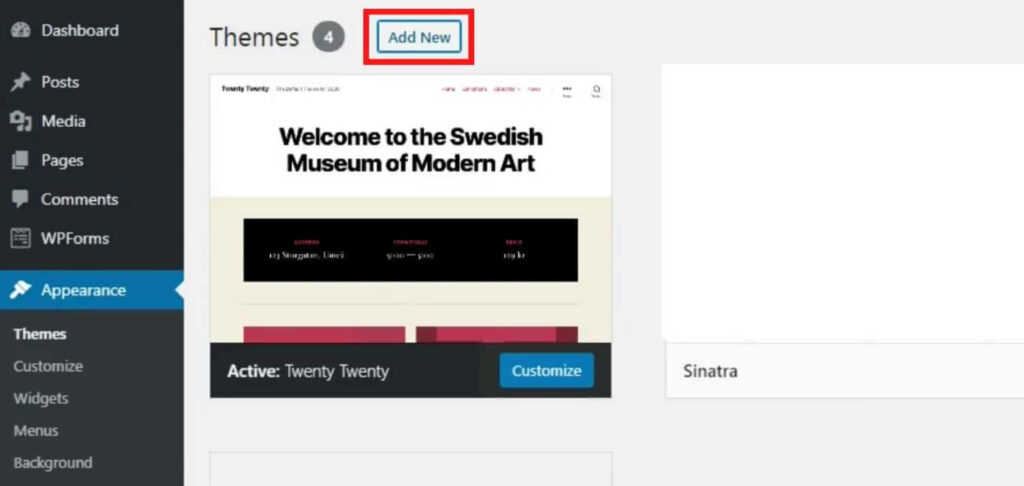
- Go to the WordPress dashboard. In the side menu, hover over ‘Appearance’ and select “Themes“.
- Click on the “Add New” button to install a theme.
- If you want to install a free theme, you can search for it by entering its name in the search box. Once you find it, click on the “Install” button.
- If you choose to install a premium theme, you can upload the file by clicking on the “Upload Theme” button that appears at the top.
- Once the installation finishes, click on “Activate” to make the theme live on your website.
Having installed the theme, now it’s time to customize it depending on our needs. Let’s get started with the customization process.
There are three ways to customize a WordPress theme.
- WordPress customizer
- Drag-and-drop website builder plugins like Elementor
- Coding
The first two methods are pretty user-friendly. Even if you’re a non-technical person, you can easily modify the appearance of your blog website using the built-in WordPress customizer or Elementor.
You can access the built-in WordPress customizer through the following method.
- Go to the WordPress dashboard.
- In the side menu, hover over ‘Appearance’ and click on “Customize“.
If you have coding skills and prefer to do things manually, you can code and modify the theme of your website. I personally don’t prefer this method as it consumes a lot of time, which we can otherwise use to write blogs.
Ok! I hope that you got a clear idea of customizing the theme of a blog website.
Step #6: Install the necessary plugins
A plugin in WordPress is a software or application that helps extend the functionality of a website (blog) without the need to code.
Currently, there are 58,664 free plugins in the WordPress plugin directory, which is a whopping number. Among the wide range of available plugins, I have made a list of the plugins essential to run a successful WordPress blog.
- UpdraftPlus WordPress Backup Plugin: A website is a set of codes, and there are chances for it to get corrupted — though rare. With UpdraftPlus, you can schedule automatic backups for your website. When something goes wrong, you can restore the backup in a few minutes.
- WPForms: If you run a blog, you must provide a way for the customers to contact you. WPForms lets you create professional contact forms with ease, thanks to its user-friendly interface. If you want to create more complex forms like registration forms, polls, surveys, etc., you can opt for the premium version — WPForms Pro.
- WP Fastest Cache: WP Fastest Cache plugin will cache the blogs as static files. Thus, when someone requests these files (blogs), the plugin will serve the blog faster.
- Post Type Switcher: In your blogging website, you’ll sometimes need to switch a content type between ‘Pages’ and ‘Posts’. The Post Type Switcher makes the switch happen in a single click.
- All in One SEO: All in One SEO is an SEO plugin that helps optimize your blog for SEO. If you’re a beginner, you’ll find this tool beneficial to check keyword optimization, title optimization, etc. The plugin also displays a TruSEO score, which helps in creating more SEO-friendly blogs.
- Yoast Duplicate Post: The Yoast Duplicate Post lets you easily duplicate any page or post with one click. This plugin can be beneficial when you’re making changes to your blogging website.
Step #7: Add a blog post
Adding a blog post in WordPress is pretty simple. Below, I have listed the steps to do so.
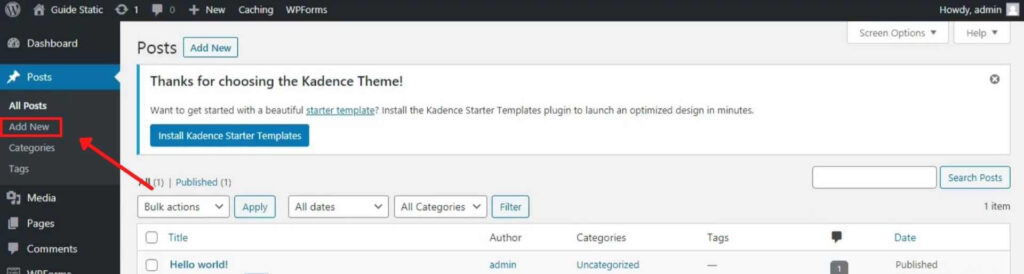
- Go to the WordPress dashboard.
- In the WordPress dashboard, hover over ‘Posts’ that appear in the sidebar. Click on “Add New“.
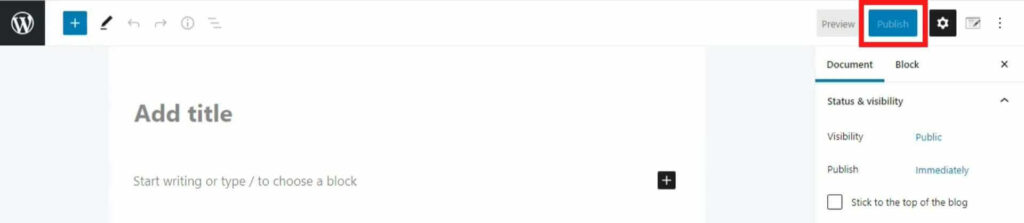
- Once clicked, the WordPress Editor will open where you can start writing your blog. Even if you’re a first-time user, you’ll find the WordPress Editor to be user-friendly.
- After you finish writing the blog, click on the blue “Publish” button to make the blog visible to the public.
Congrats! You have successfully published your first WordPress blog.
Conclusion
Starting a blog in WordPress is pretty simple, even if it’s your first time doing so. In fact, you can create and publish your blog on the internet in less than an hour.
In this era, starting a blog is a fantastic money-making opportunity. There are several ways to monetize (earn revenue) your blog. Some of them include selling online courses, offering paid membership plans, utilizing affiliate marketing, sponsored posts, selling digital products like ebooks, etc.
Sounds good to hear! However, if you want to make money through your blog, you should first grow and make your blog receive steady and high traffic.
Increasing traffic is the part where many people fail and give up their blogging dreams. The primary reason behind this could be the lack of patience and SEO skills.
Though starting a blog in WordPress is pretty simple, succeeding in it requires SEO skills. If you don’t optimize your blog for SEO, trust me, it’s pretty difficult to rank it high on the search results — even if your blog is valuable and informative.
SEO skills aren’t difficult to acquire. In fact, you can get a fundamental idea of writing a successful blog post and SEO by reading the following guides.
- How to write a good blog post: A comprehensive guide (2022)
- 8 AWESOME SEO tips to boost your website’s traffic: A detailed guide
Note: These guides are pretty lengthy. So, if you’re busy and have urgent work to complete, I urge you to bookmark these guides so that you can read them later.
I hope you found this guide beneficial. Also, I hope that you got a clear idea to start a blog in WordPress.
If you have any questions, suggestions, or doubts about starting in blog, let’s discuss them in the comment section below.
I wish everyone All the Best to succeed in your blogging journey!
