How to use Google Keyword Planner: A detailed guide!
-
Abdul Wadood
How to use Google Keyword Planner? Are you interested in learning about it?
If YES, you have arrived at the right place. In this guide, I have explained in detail all you need to know about the Google Keyword Planner tool.
Let’s get started!
Here are the topics to be discussed in this blog. If you are in a hurry, feel free to skip to the part you want to read.
What is Google Keyword Planner?
The Google Keyword Planner is a keyword research tool designed to help the advertisers on Google.
Besides using the tool for advertising purposes, you can use the tool for SEO purposes too! In fact, I personally use Google Keyword Planner combined with some other SEO tools for performing keyword research.
Don’t be shocked! I found the focus keyword for this guide from Google Keyword Planner.
Awesome, correct?!
Since Google Keyword Planner is related to Google Ads, you need to have a Google Ads account to use the tool.
Don’t worry! You can create a Google Ads account in two to three minutes, and I have explained the procedure below.
How to use Google Keyword Planner?
The following are the steps involved in creating a Google Ads account, accessing Google Keyword Planner, performing keyword research, and choosing a keyword.
Step #1: Create a Google Ads account and access Google Keyword Planner
Go to the Google Ads page and click on ‘Get Started’.

Sign in to Google Ads using your Google account.
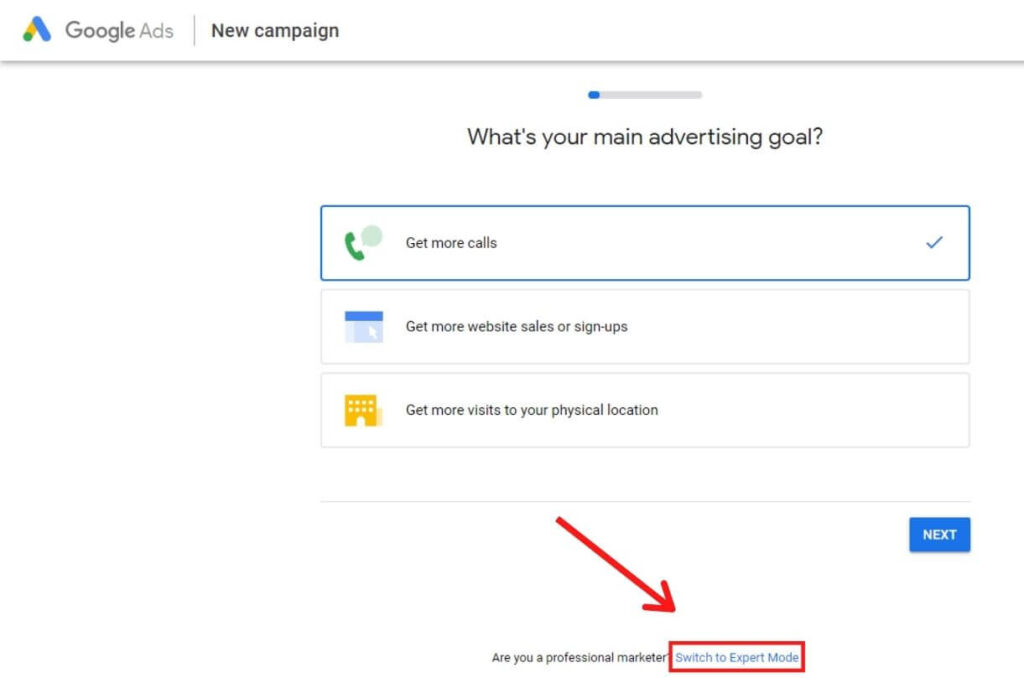
Once you sign in, Google will take you to a page similar to this. Scroll down, and click on ‘Switch to Expert Mode’.
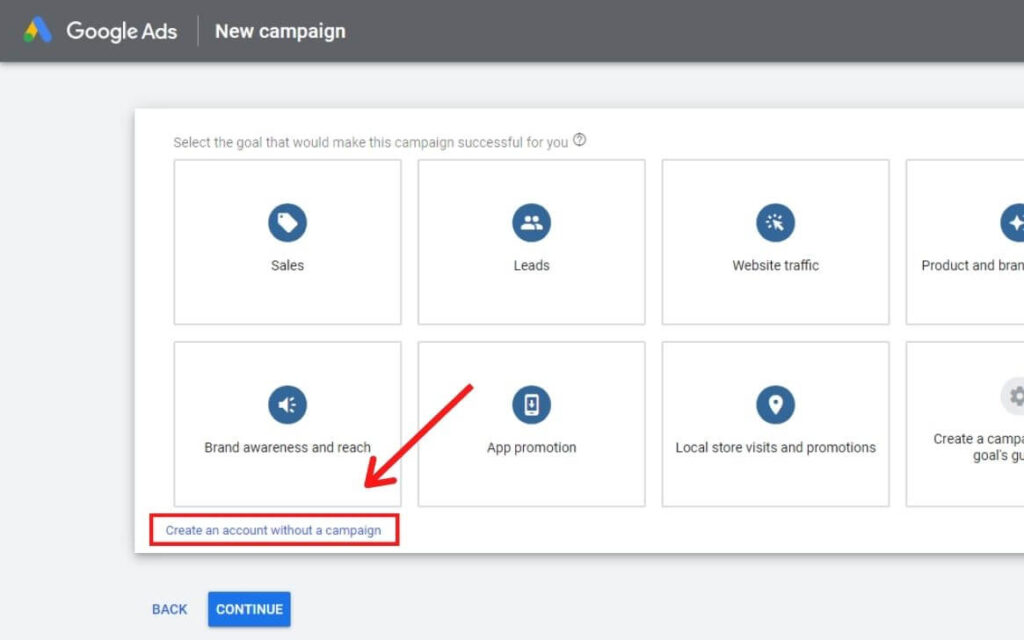
Now, click on ‘Create an account without a campaign’.
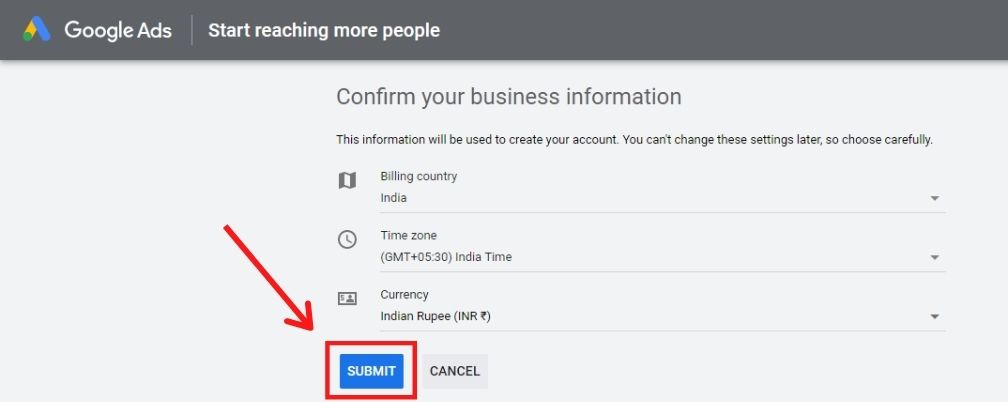
Next, confirm your business information and click ‘Submit’. Be noted that, after creating an account, you can’t change this information. So make sure that the information is correct.
You have successfully created your Google Ads account. Click on ‘Explore your account’.
This takes you to the Google Ads dashboard.
To access the Google Keyword Planner, click on the wrench icon that appears on the toolbar. From the list of options, select ‘Keyword Planner’.

Congrats! You have successfully accessed the Google Keyword Planner. Let’s begin with our keyword research!
Step #2: Understanding the tools within Google Keyword Planner
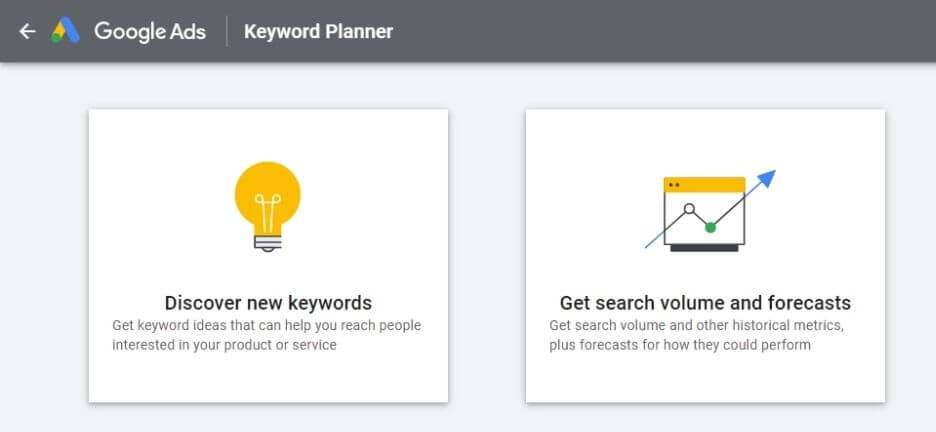
As you can see, there are two tools within the Google Keyword Planner, “Discover new keywords” and “Get search volume and forecasts”.
These tools are designed for advertisers; however, you can use the tools for SEO purposes too! The tools offer sufficient information for both purposes, but we need to choose the information we require depending on our goal.
Discover new keywords
If you want to find new keywords, you should use the discover new keywords tool.
In the search bar, type the keywords for which you want to know the statistics. Also, make sure that you have selected the correct target location and language.
For demonstration, I will select my target location as the ‘United States’, language as ‘English’, and research the keywords related to typing fast.
If you wonder how I entered multiple keywords in the search bar, it’s pretty simple! Just add a comma next to each keyword and click enter. Once you have entered the keywords, click on ‘Get Results’.
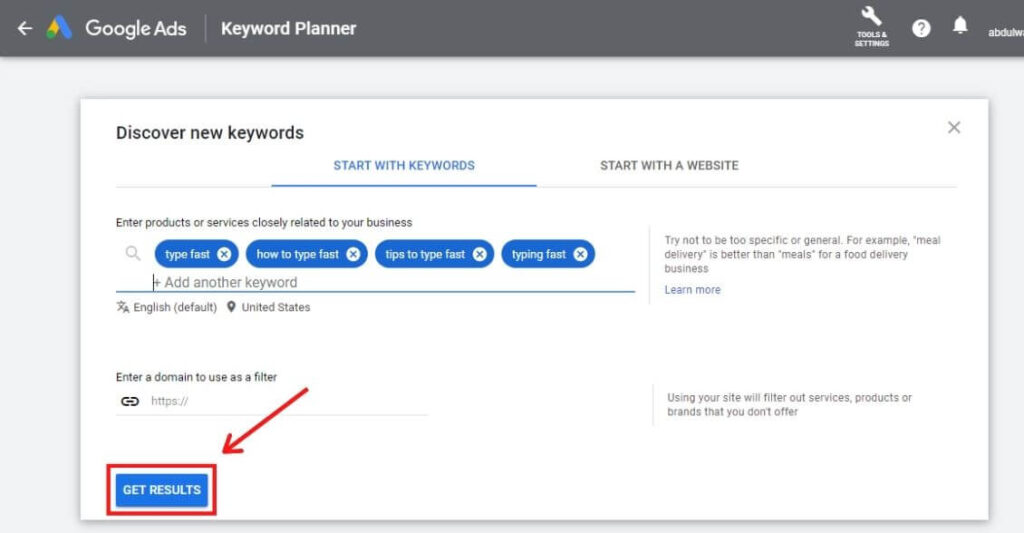
This will display the data of the keywords that you have entered. I will explain about understanding the data in the next step.
Get search volume and forecasts
As the name suggests, the “get search volume and forecasts” tool is used to find the search volume and forecasts of the keywords you entered.
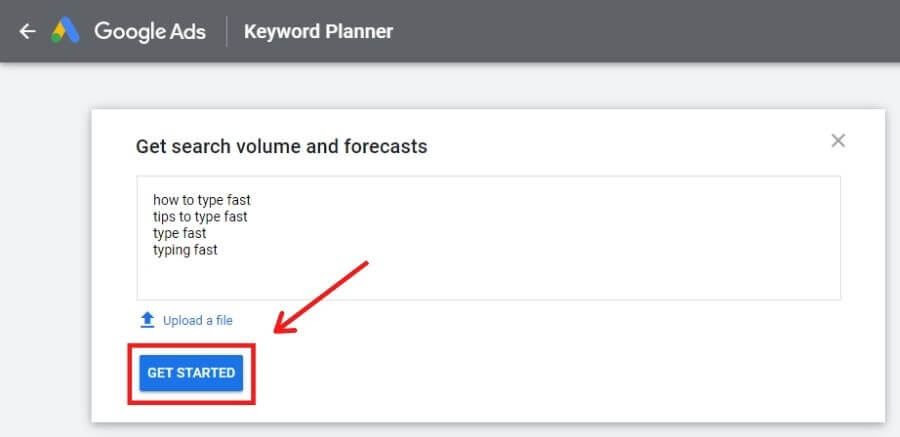
Note: You should not use this tool to generate new keyword ideas. Instead, if you have a list of keywords in mind, you can type them in the box and get their data.
Once you have entered the keywords, click on ‘Get Started’. Besides entering the keywords directly, you can also upload a .csv file that contains the keywords.
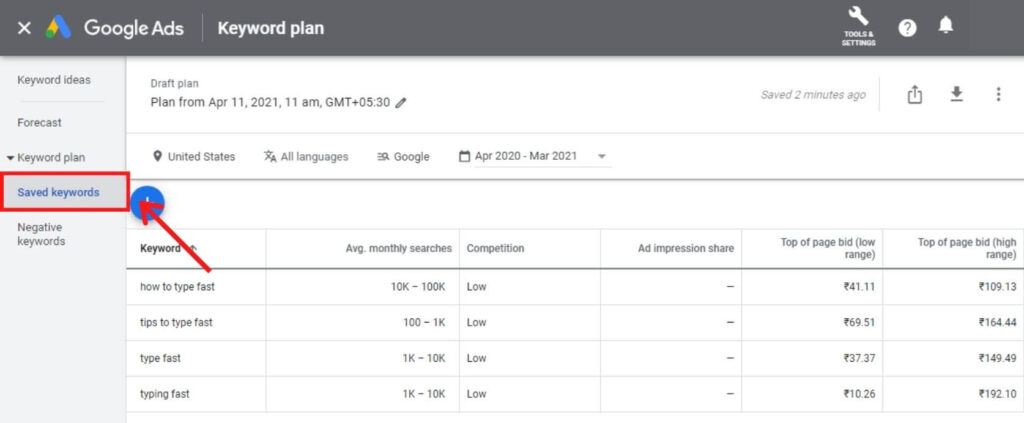
The “Saved keywords” section will give you information about search volume, competition, bid value, etc.
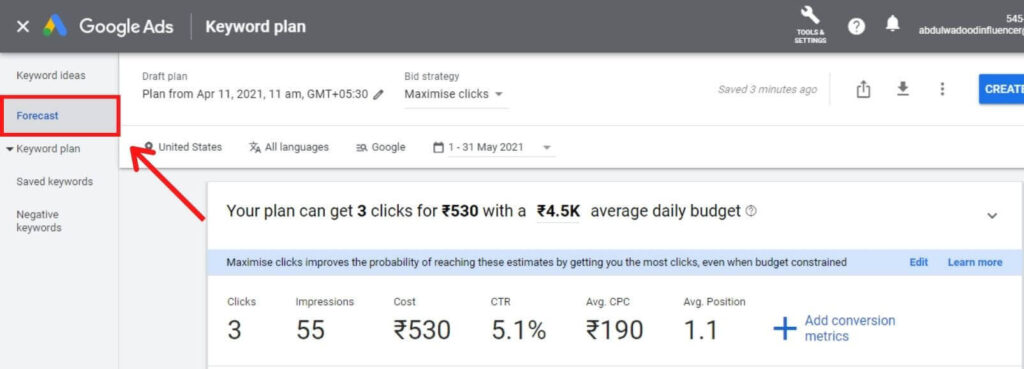
To see the forecasts of the entered keywords, click on “Forecast” from the side menu.
Step #3: Understanding the results
Having got the data, now it’s time for us to understand the results.
Note: The understanding and interpretation of the results are identical for both the Google Keyword Planner tools.
Upon clicking ‘Get Results’, a page with the keyword results will welcome you. The page contains the data for the keywords you have provided, and it also includes new keyword ideas. I will explain new keyword ideas in the next step.
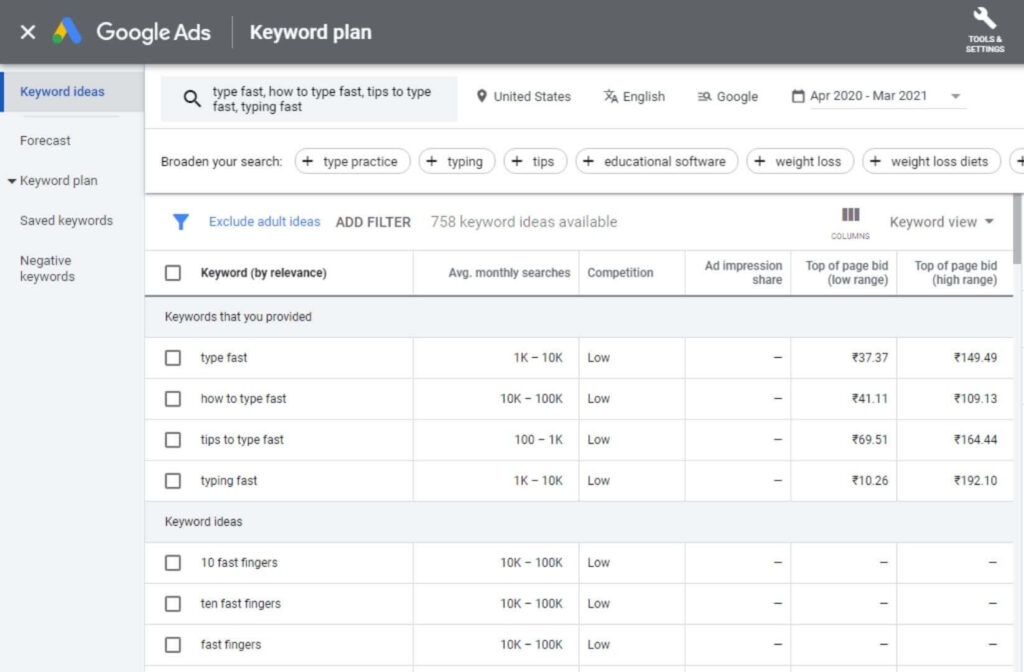
The keyword results page displays various metrics that will benefit during keyword research. The metrics are as follows:
- Average monthly searches
- Competition
- Ad impression share
- Top of page bid
- Account status
- Competition (indexed value)
- Organic impression share
- Organic average position
Note: By default, you will only see the metrics till Account status. To view the remaining metrics, click on ‘Columns’, and select the metrics you want to add.
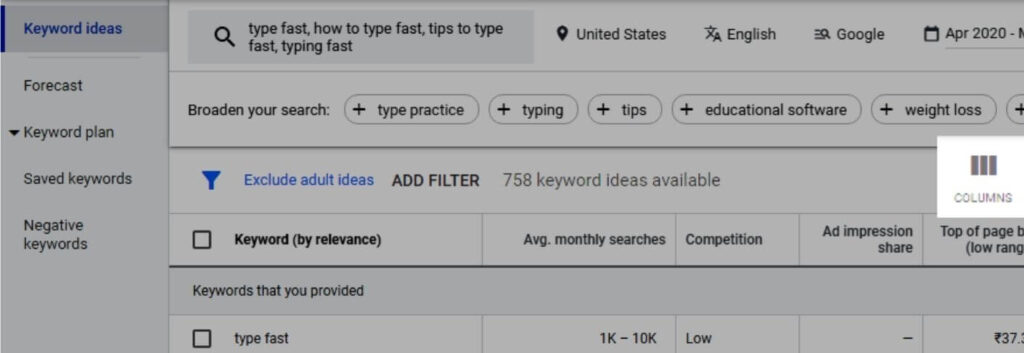
Ok! Here’s a quick explanation of the metrics.
Average monthly searches
As the name suggests, average monthly searches refer to the average number of searches made for a keyword on a particular month.
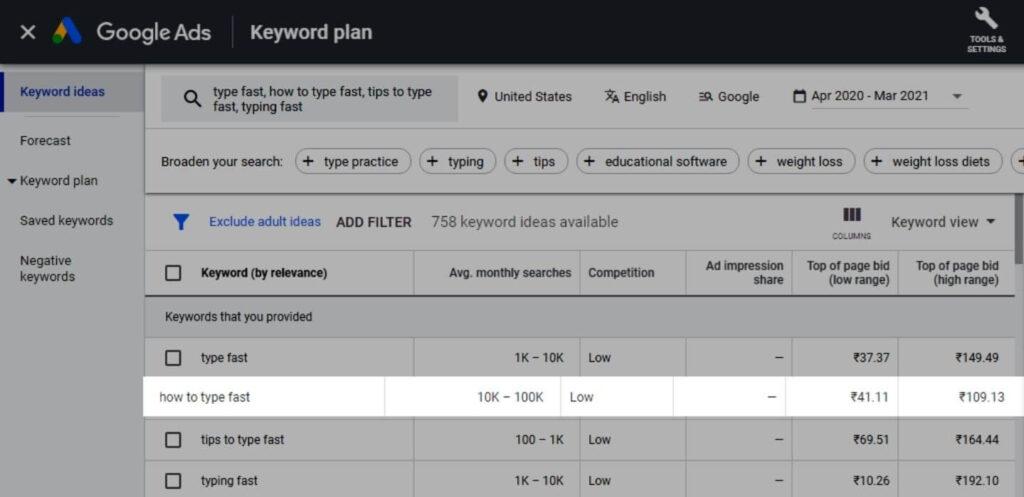
If your website is new and doesn’t have high domain authority, I highly recommend trying to rank for long-tail keywords. In the above example, instead of trying to rank for “type fast”, you can try ranking for “how to type fast”. By doing so, there is a higher chance that your blog comes up on the first page of the search results.
Usually, websites with high domain authority will try to rank for popular keywords. Of course, a new website can’t compete with an established website! So, initially, you can get better results by ranking for long-tail keywords.
You might be wondering why Google Keyword Planner displays the range of average monthly searches and not the exact volume?
The reason is simple! You will see the exact volume of the average monthly searches once you start running a campaign (pay money to Google). By the way, hats off to the excellent selling strategy from Google!
To be honest, you can choose a keyword by looking at the range itself. But, there is a quick way around to get the exact search volume.
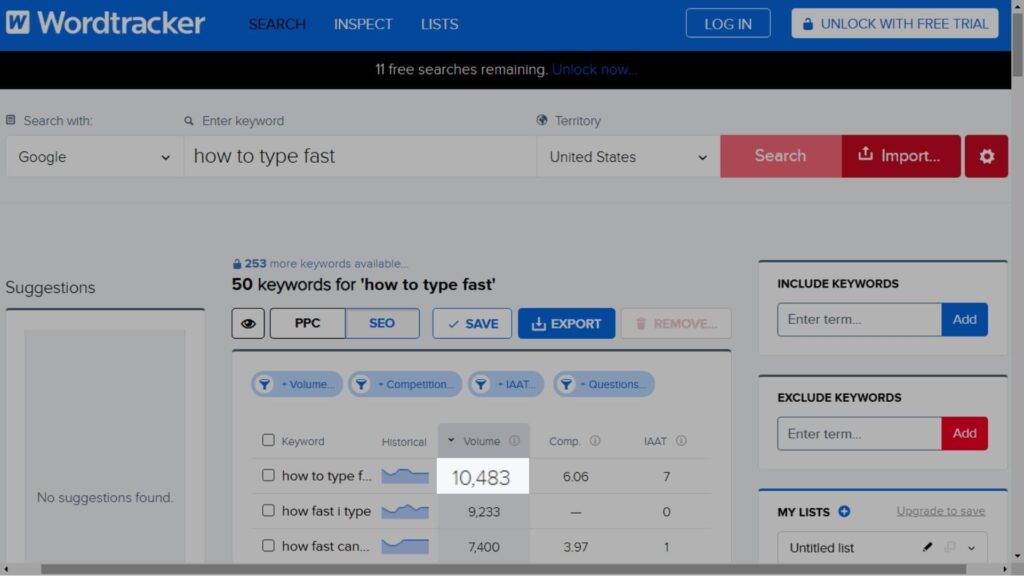
Shortlist the keywords for which you need to know the search volume. I have shortlisted the “how to type fast” keyword as it is long-tail, and the range of the monthly search volume is also decent.
Next, using freemium tools like Ubersuggest and Wordtracker, find the exact search volume. These tools are freemium because they offer some free searches.
The average monthly search volume for the keyword “how to type fast” is 10,483.
Ok, great! I hope that you understood the method of extracting the exact average search volume of a particular keyword.
Competition
The ‘competition’ scale between “Low”, “Medium”, and “High”.
As mentioned earlier, Google Keyword Planner is designed for advertisers on Google. So, the ‘competition’ that Google Keyword Planner shows for a keyword is for PPC and not SEO.
But, in many cases, if the competition is less for PPC, then it will be most probably less for SEO too! However, using the freemium tools, you can extract the exact SEO competition for a keyword.
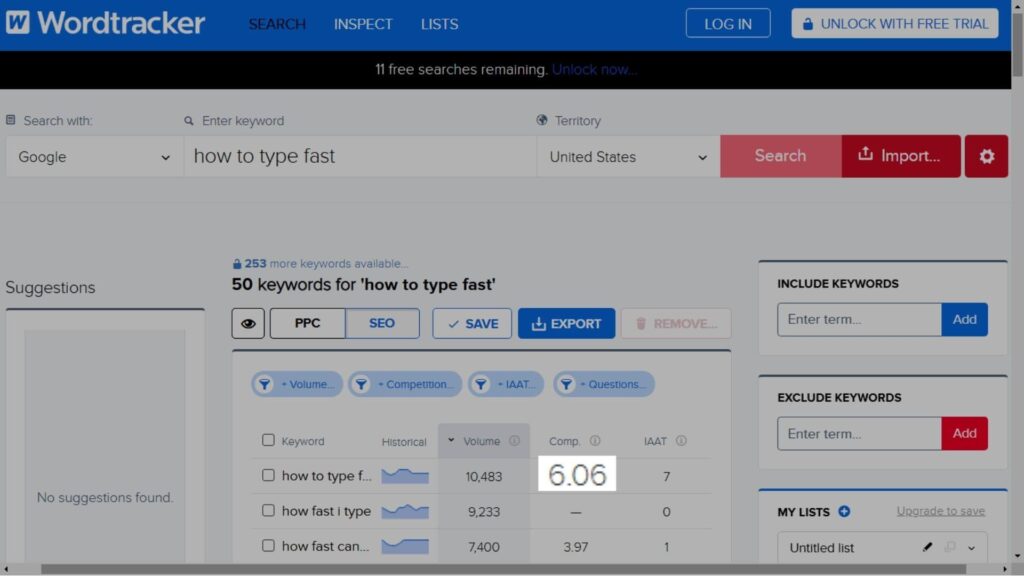
The competition for the keyword “how to type fast” is 6.06, which is pretty less.
To be honest, the keyword “how to type fast” is incredible, and I may myself publish a blog on this website using this as a focus keyword.
Ad impression share
Ad impression share is a metric that will be beneficial for those advertising on Google. For SEO, you don’t need to consider this.
According to Google, ad impression share is the number of times people will see your ad, divided by the total number of searches that matched your keyword exactly in the last month for your selected location and network.
Top of page bid
As the name suggests, top of page bid refers to the amount of money you will pay for your advertisement to display on the top of a page.
As you have seen in the image above, there are both “top of page bid (low range)” and “top of page bid (high range)”.
In my view, if a keyword has a high bid rate, then I would recommend choosing that keyword for SEO purposes because a higher rate indicates that the keyword is good and it is on-demand. On the other hand, for PPC, select the keywords with a low bid rate.
Account status
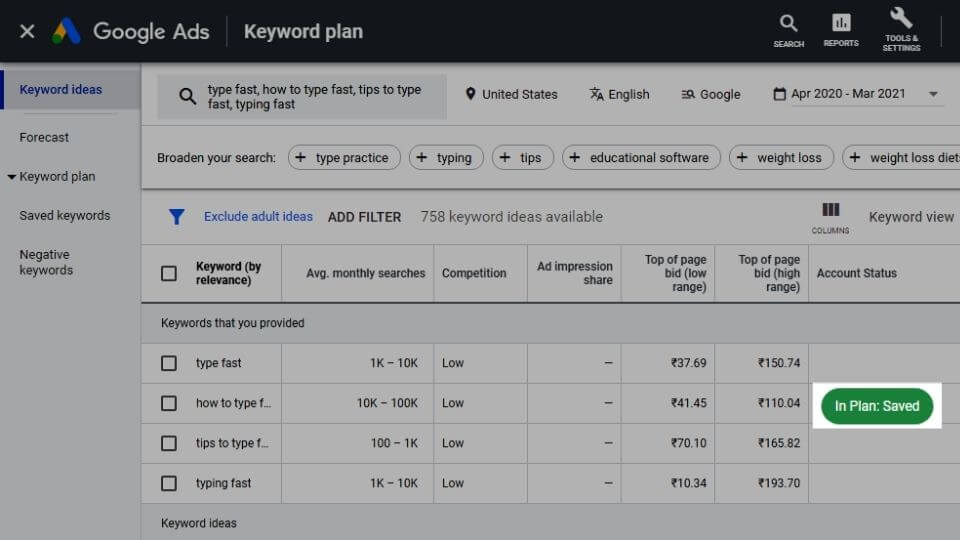
Account status indicates the status of a particular keyword in your account.
For example, if I add the keyword “how to type fast” to plan, it will display as “In Plan: Saved” in the Account Status.
Organic impression share
Organic impression share refers to the number of times your website appeared in the organic search results (unpaid results).
To use this feature, it is essential to connect your Google Analytics account to your Google Ads account.
Organic average position
Organic average position refers to the average rank of your website in the organic search results.
Again, to use this feature, it is essential to connect your Google Analytics account to your Google Ads account.
I hope you have clearly understood the interpretation of the various metrics on the keywords results page.
Now, I will quickly take you through the filters on the keyword results page.
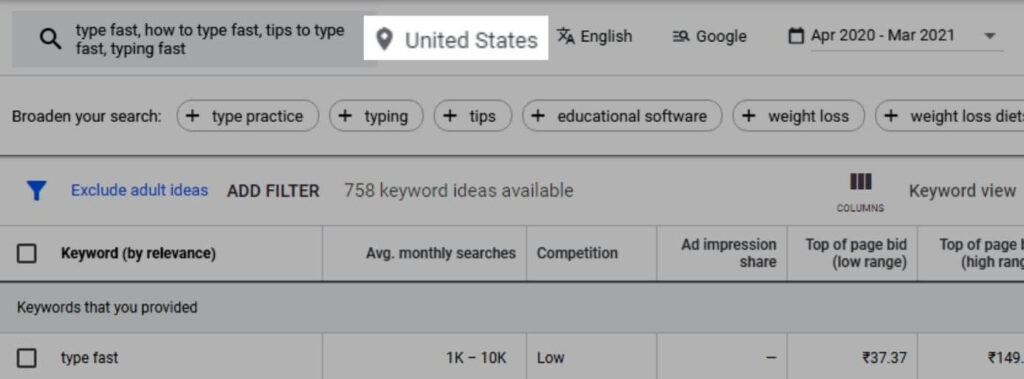
“Location” filter
Select your target location. My target location is the United States. If you don’t have an idea about your target location, don’t select any location to target, and this will, by default, target all the locations.
“Language” filter
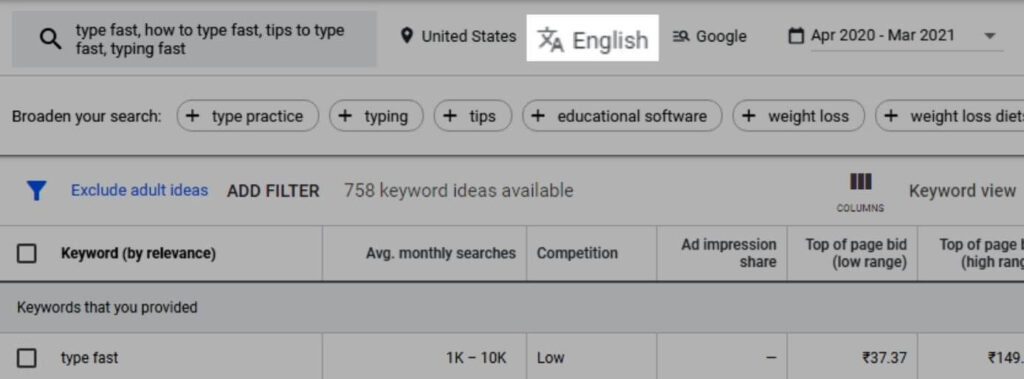
Select your target language. In my case, the target language is English.
If you are targeting people from Qatar, then you can choose your target language as Arabic. So, basically, this feature comes in handy when you are targeting people outside English-speaking countries.
“Search networks” filter
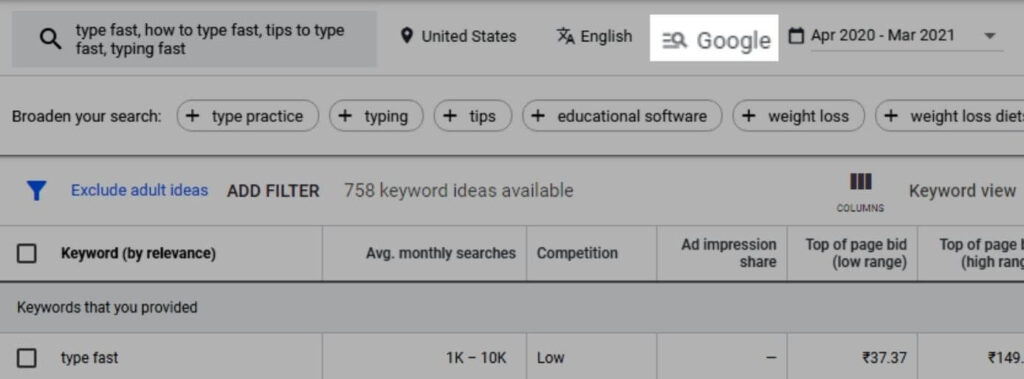
Select the platform on which you want to run your advertisements. You can either choose Google or its search partners like YouTube to run your ads.
I have selected ‘Google’ as my search network.
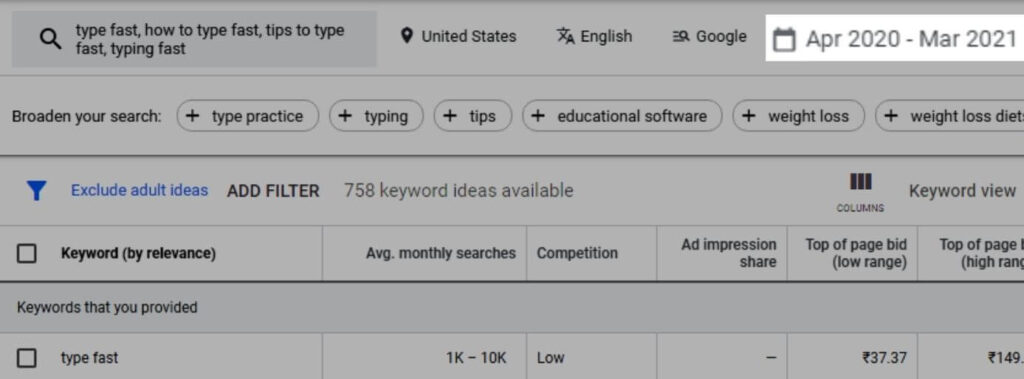
“Date range” filter
Select the date range for which you want to see the data of the keywords. I suggest leaving it at its default setting, twelve months.
Besides the filters mentioned above, there are other filters that you can apply.
Exclude Adult Ideas
As the name suggests, you won’t see the adult keyword ideas when you apply this filter.
Apart from this, there are many more filter options under the ‘Add Filter’. Besides “Exclude keywords in my account” and “Exclude keywords in my plan”, I have already explained the other filters above.
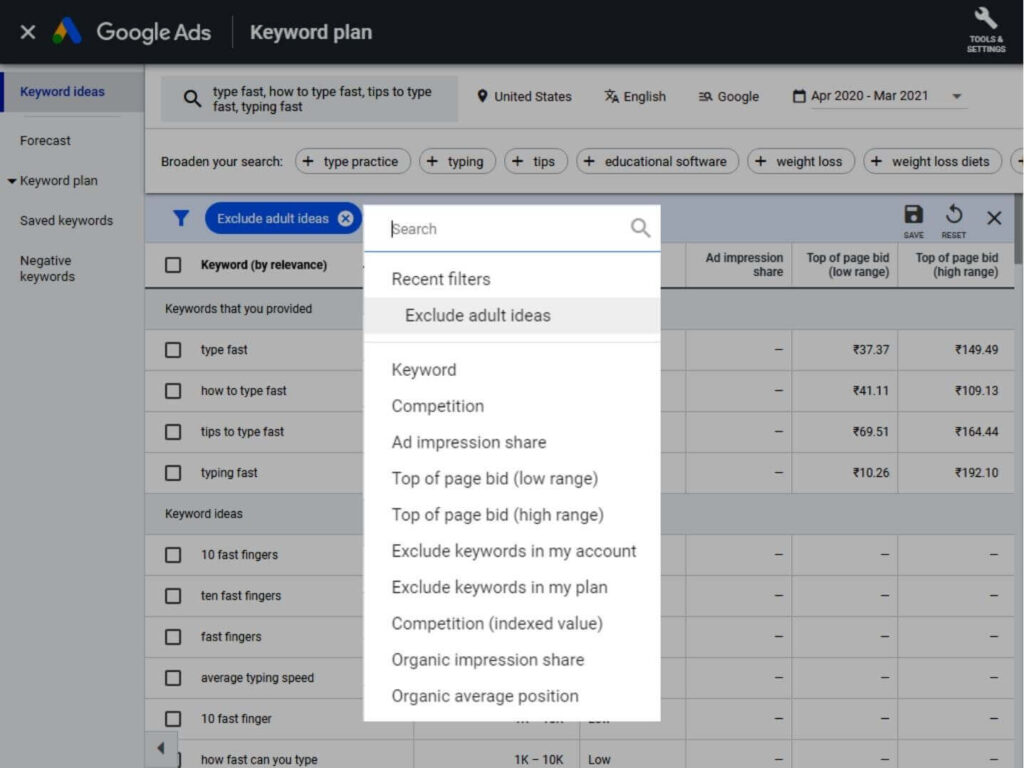
Exclude keywords in my account
When you apply this filter, the Google Keyword Planner tool will exclude the keywords in your account from the results.
Exclude the keywords in my plan
Similarly, when you apply this filter, the Google Keyword Planner tool will exclude the keywords in your plan from the results.
I hope you have clearly understood the method of understanding the data from the “Discover new keywords” tool.
Using the same technique, you can understand and interpret the keyword results from the “Get search volume and forecasts” tool.
Step #4: Go through the keyword ideas section
Besides displaying the data for the keywords provided, the Google Keyword Planner also shows keyword ideas.
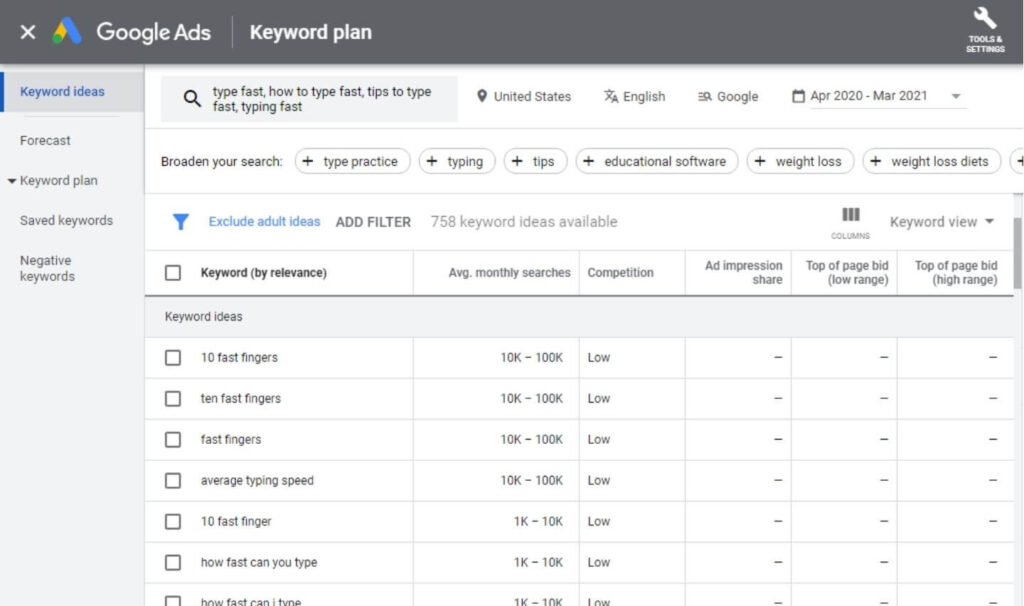
The (↓) arrow indicates that the keywords are arranged from the highest average monthly searches to the lowest.
Similarly, the (↑) arrow indicates that the keywords are arranged from the lowest average monthly searches to the highest.
Competition
As mentioned earlier, Google Keyword Planner is designed for advertisers on Google. So, the competition value is for PPC and not SEO.
However, if the competition is less for PPC, there is a high chance that it will be less for SEO!
So, from the ‘Add Filter’ → click on ‘Competition’ → select “Low” → click ‘Apply’.
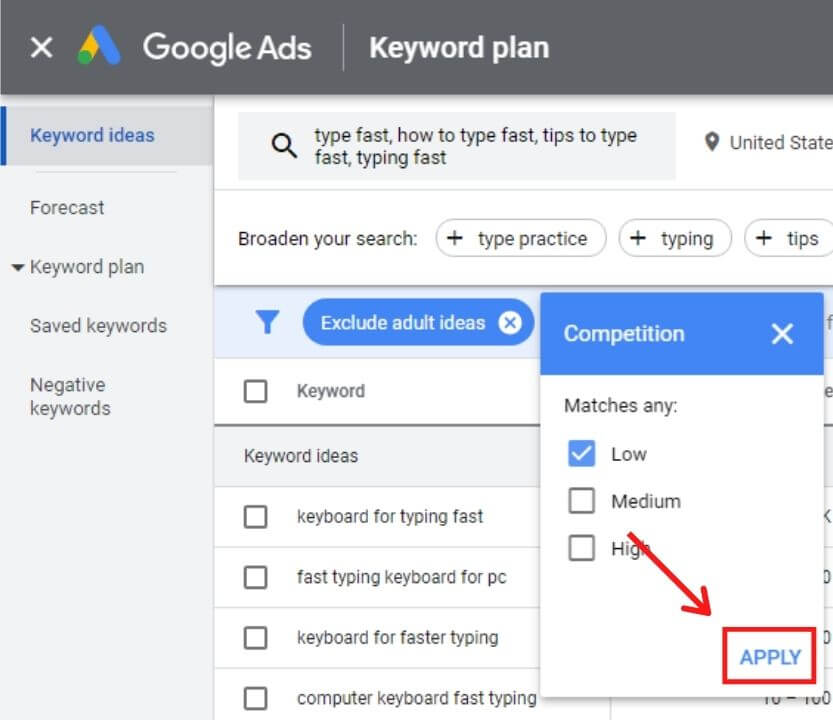
When shortlisting the keywords, I primarily look for “Average monthly searches” and “Competition”. Besides them, I also check whether the “Top of page bid (High range)” is decent.
When a keyword satisfies the requirements, I shortlist it.
Step #5: Choose a keyword
Now we have arrived at the most critical and exciting step, choosing a keyword.
If you are a beginner, choosing a good keyword from the massive list would be overwhelming!
However, by following the techniques I mentioned above, you can choose a keyword pretty easily.
In the above example, after analyzing the data from the keywords provided and keyword ideas, I have chosen the “how to type fast” keyword. The reason is that the keyword has a decent search volume and pretty low SEO competition. Moreover, the keyword will perform well for PPC too! The keyword has a low PPC competition, and the bid value is decent.
I hope that, by now, you have clearly understood the technique of choosing a keyword for both SEO and advertising purposes from Google Keyword Planner.
If you still have doubts, don’t worry! I will quickly give another example of choosing a keyword using the above strategies.
In this example, I will research keywords related to concentration. The following are the steps to choose the keyword (don’t get bored, I will explain pretty quickly).
Step #1: Since I want to find new keywords, I will use the “Discover new keywords” tool in the Google Keyword Planner.
Step #2: After quick thinking, I entered the keywords “effective concentration”, “how to concentrate”, and “tips to concentrate” in the search bar. The information that Google Keyword Planner pulls out highly depends on the keywords you provide. So, make sure to enter relevant keywords.
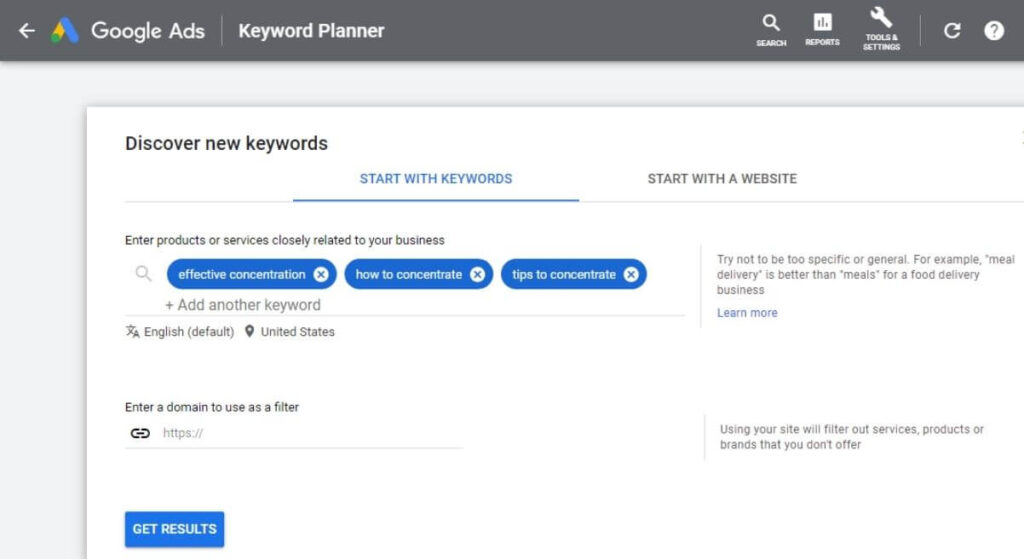
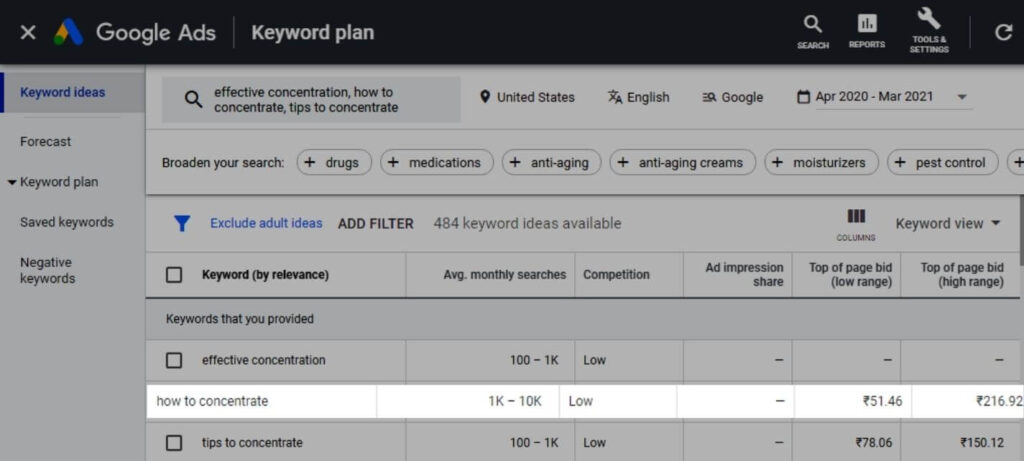
Step #3: By looking at the data of the keywords provided and keyword ideas, it seems that the keyword “how to concentrate” is the one to opt for. The search range is decent, and the PPC competition is low.
Step #4: To get the exact search volume and SEO competition for the keyword, I will search it on Wordtracker.
Step #5: The exact search volume for the keyword “how to concentrate” is 1,575, and the competition is 10.14, which is pretty less. However, from Wordtracker’s keyword ideas, I found a better keyword, “how to focus better”. This keyword has a higher search volume, 4,183, and the competition is also lower at 7.52. The exact keyword performs well for PPC too!
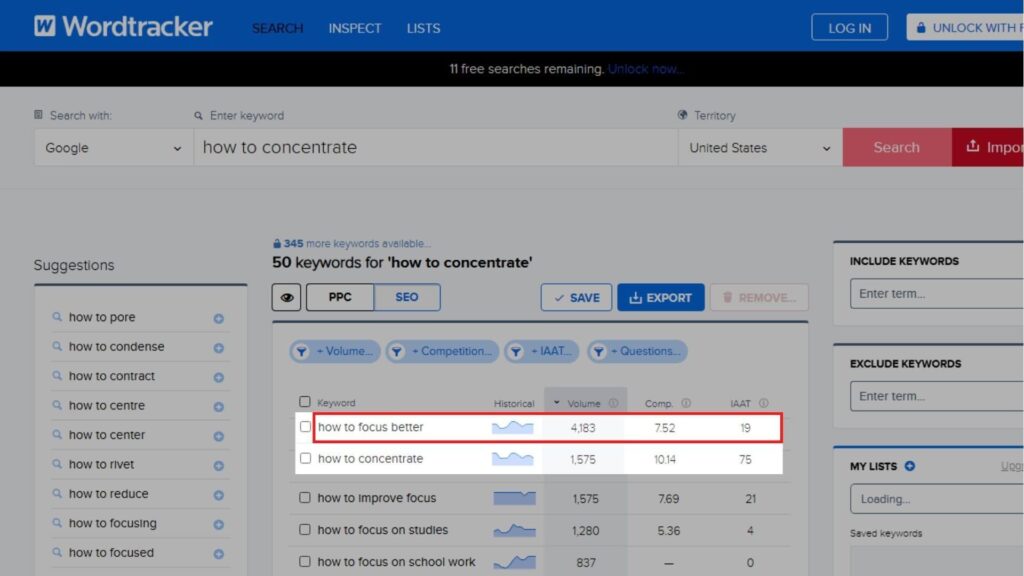
Step #6: By looking and analyzing the data, I have chosen the keyword “how to focus better”.
Now I hope that everyone has understood the method of choosing a keyword.
Conclusion
This is the end of the detailed guide on how to use Google Keyword Planner. I hope you liked it and I hope that it was beneficial to you.
Google Keyword Planner is an excellent keyword research tool. Sure, it doesn’t give several keyword ideas and data that the premium tools offer, but the information provided is sufficient!
Also, Google Keyword Planner was designed for advertisers, so this is one of its limitations in using the tool for SEO. However, as demonstrated in the guide, for SEO purposes, if you perform keyword research using a combination of tools, such as Google Keyword Planner + Ubersuggest/Wordtracker, you can extract a good amount of keyword data and keyword ideas.
If you have any questions regarding keyword research or using Google Keyword Planner, let’s discuss them in the comment section below.
