How to add meta tags in WordPress?
-
Abdul Wadood
Meta tags are invisible tags that let search engines understand your website’s content.
Fortunately, adding meta tags in WordPress is pretty simple — though WordPress doesn’t directly support meta tags.
If you’re new to WordPress, you would have probably searched for a method to add meta tags. If so, you’ve arrived at the right place.
In this blog, I’ve explained the methods to add meta tags in WordPress.
What are meta tags?
Meta tags are HTML code snippets that represent your website’s content. They display information such as the title, description, keywords, etc.
The site owners use meta tags to display their website information to the search engines. These tags are invisible to the users.
More than a decade ago, Google used to consider keyword meta tags as a ranking factor. However, since 2009, they have officially stopped using keyword meta tags as a web ranking factor.
How to add meta tags in WordPress?
There are two methods to add meta tags in WordPress.
- Method #1: Using plugins
- Method #2: Manual method
I prefer to add meta tags using plugins as it’s the easiest way. Also, with plugins, you can add meta tags to a specific page or post.
If you add meta tags manually, the changes will reflect on the entire website, and it’s not specific to a page or post.
Nevertheless, I’ll explain both the methods below.
Method #1: Using plugins
Several plugins can help you with adding meta tags to your WordPress website. Below, I’ll demonstrate to add meta tags using the Rank Math SEO plugin — one of the best WordPress plugins for SEO.
Step #1: Install the Rank Math SEO plugin
The following are the steps to install the Rank Match SEO plugin or any other WordPress plugins, for that matter.
- Login to the WordPress dashboard.
- In the side menu, hover over “Plugins” and click “Add New”.
- Enter the plugin name “Rank Math SEO” in the search box.
- Click on “Install Now” to download the plugin. Once done, “Activate” the plugin.
Note: Rank Math SEO has both free and premium versions. The free version is sufficient to add meta tags. However, if you want added SEO features, you can opt for the premium version.
Once you install the Rank Math SEO plugin, run the setup wizard and configure the plugin according to your needs.
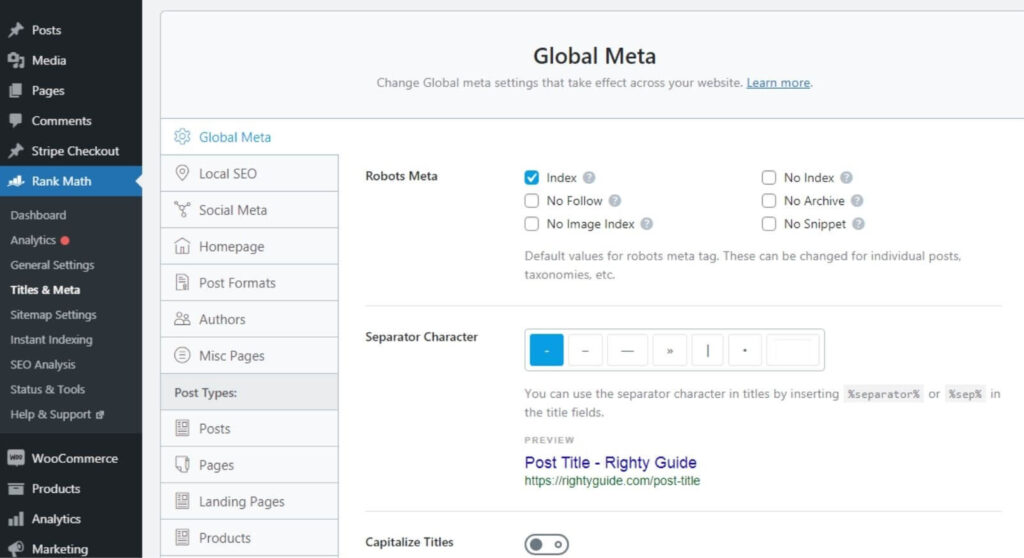
Step #2: Access the Global Meta settings
Configuring the Global Meta settings will make the changes apply to the entire website.
The following are the steps to access the Global Meta settings.
- Login to the WordPress dashboard.
- In the side menu, hover over “Rank Math” and click “Titles & Meta”.
- Configure the settings to suit your needs.
If you want to add meta tags to a specific page or post, follow the procedure explained in the next step.
Step #3: Add meta tags to a specific page or post
The following are the steps to add meta tags to specific pages or posts.
- Login to the WordPress dashboard.
- In the side menu, hover over “Pages” or “Posts” and click “All Pages” or “All Posts”.
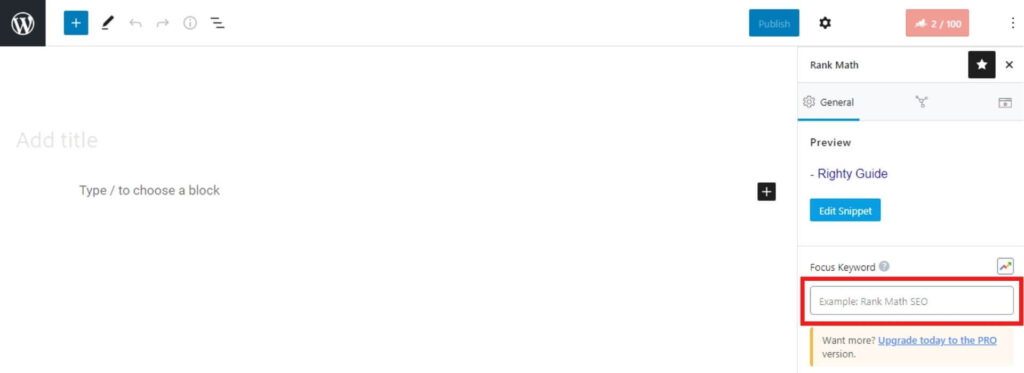
- From the list, click the “Edit” button that appears below a page or post.
- In the WordPress Editor, click the “Rank Math SEO” icon appearing in the menu bar.

- Enter your primary keyword in the “Focus Keyword” box.
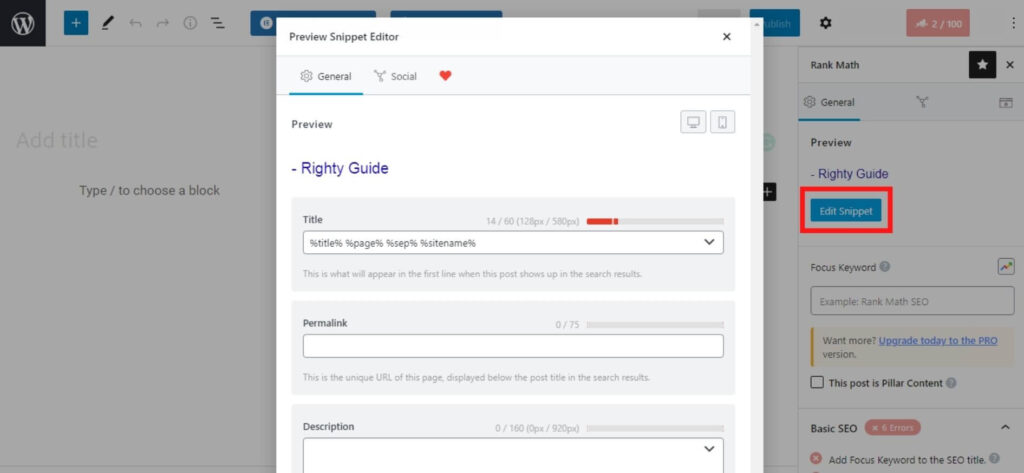
- Next, click on “Edit Snippet” to add title, permalink, and meta description.
That’s it!
Method #2: Manual method
Manually adding meta tags in WordPress is pretty simple. Below, I’ve listed the steps to do so.
Step #1: Log in to the control panel (cPanel) of your hosting account. Next, access the “File Manager”.
Step #2: Click on the “public_html” folder.
Step #3: Click on “wp-content”.
Step #4: Click on “themes”. Next, click on the folder with your theme name.
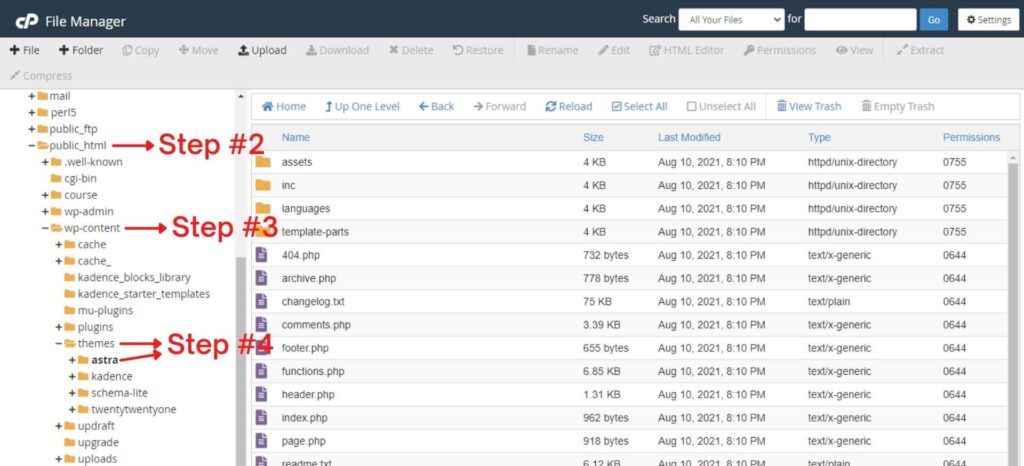
Step #5: Right-click on the header.php template. From the list of options, select “Edit”.
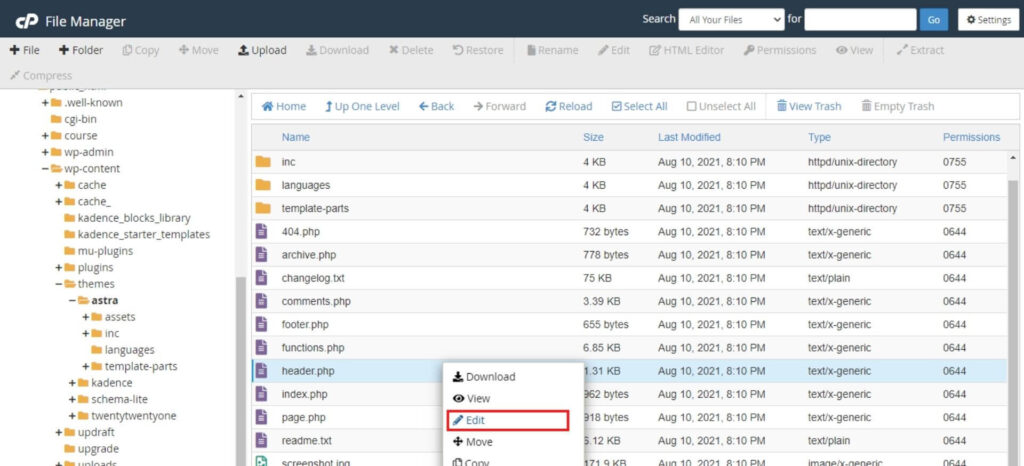
Step #6: Add the meta tags within the <head> </head> tags.
Step #7: Once you have added the meta tags, click on “Save Changes”.
Note: Do not delete or edit any of the existing contents in the header.php file, as it may cause errors in your website.
That’s it. You’ve successfully added the meta tags to your website!
As mentioned before, if you add the meta tags manually, the changes will reflect on the entire website, and it’s not specific to a page or post.
If you have a website with several pages or posts, you can use a plugin to add unique meta tags.
Conclusion
I hope you found this blog beneficial and got a clear idea to add meta tags in WordPress.
WordPress doesn’t support meta tags by default. However, it’s yet pretty simple to add meta tags. Depending on your requirements, you can either add meta tags using plugins or manually.
Ok!
If you’ve any doubts regarding adding meta tags to WordPress, let’s discuss them in the comment section below.
